
Setting up Bossett's BlueSky Feed Generator

I have build a small framework for Bluesky feeds that allows a developer to quickly spin up new feeds by cloning a single source file and making very minor tweaks. It allows for arbitrary code to be run to create filters, manipulate lists, etc.; and has a number of helper functions to pull data using ATProto.
You need a working knowledge of JavaScript/TypeScript and some familiarity with code to make this all work. You will also need a MongoDB instance (which we will set up further down).
I also assume you have set up Docker and can use devcontainers with VS Code. This is not essential, but you need a working yarn installation to make this work, and the code contains a devcontainer that is known to work.
Cloning the Repository and Hosting
First, login to GitHub and visit https://github.com/Bossett/bsky-feeds/fork to create a fork. This will give you a version you can operate on your own.
 Bossett
Once you have your fork, you can clone it to your local machine.
Setting Up Bluesky and your .env
Copy .env.example to a file named .env and open the new file.
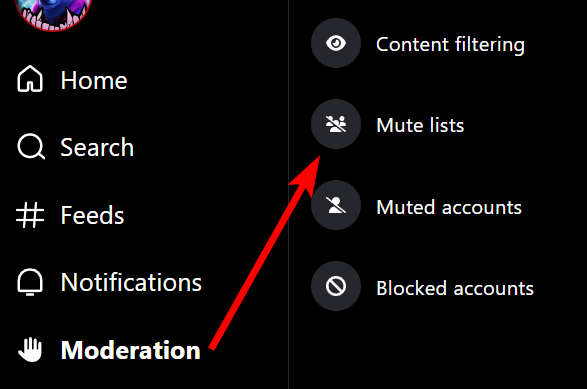
You will need (at minimum), two lists: one to host the 'For Science' example feed & a list to host the 'Auspol' example. In Bluesky, visit Moderation/Mute Lists and choose '+ New Mute List'. Create two mute lists.
Once complete, you can go into each list. Note down the URL of each list (will look like:
https://bsky.app/profile/did:plc:jfhpnnst6flqway4eaeqzj2a/lists/3k22v6pbfk32t
Note the component after /profile/ (did:plc:jfhpnnst6flqway4eaeqzj2a - this is your DID) and the component at the end (3k22v6pbfk32t - this is the rkey for your list) for each list. Place these into the .env file where you see 'SCIENCE_LISTS' and 'AUSPOL_LIST', in the following format:
at://<did>/app.bsky.graph.list/<rkey>
The top of your file should look like:
# *** SCIENCE FEED ***
# Pipe (|) separated list of lists to parse
SCIENCE_LISTS="at://<your did>/app.bsky.graph.list/<rkey for list 1>"
# The text to watch for for list inclusion.
SCIENCE_SYMBOL="🧪"
# *** ------------ ***

# *** AUSPOL FEED ***
# Single list to update to update
AUSPOL_LIST="at://<your did>/app.bsky.graph.list/<rkey for list 2>"
# The text to watch for for list inclusion.
AUSPOL_MATCH="auspol"
# *** ------------ ***
Now visit https://bsky.app/settings/app-passwords and add an App Password - name this something like 'Feed Generator' and copy the password. Paste it into the .env file as FEEDGEN_PASSWORD, and fill in FEEDGEN_PUBLISHER_DID and FEEDGEN_HANDLE:
# Set this to the DID of the account you'll use to publish the feed
FEEDGEN_PUBLISHER_DID="<your did>"

# Should be an app password
FEEDGEN_PASSWORD="<your copied password>"

# Your handle - xyz.bsky.social e.g.
FEEDGEN_HANDLE="<your handle>"
You can add users to your lists once you have completed the setup. See the final section for assistance is adding yourself to a mute list.
Setting Up Hosting
I host my feeds using Digital Ocean's App platform. The next step is to follow this link and creating an account (it's an affiliate code that will start you with some free credit).
First, visit https://cloud.digitalocean.com/databases and hit 'Create Database'. Choose the cheapest MongoDB ($15/mo at time of writing). Once it is set up, go into the database and visit the Users & Databases tab:
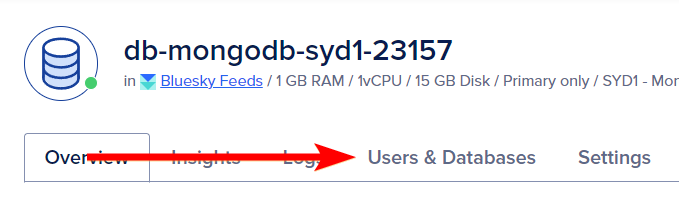
Create a new user and database called 'bsky-feedgen'.
Return to the Overview tab, choose 'Connection string', choose your new user, database and 'Copy'.

Paste this into your .env file as FEEDGEN_MONGODB_CONNECTION_STRING:
FEEDGEN_MONGODB_CONNECTION_STRING="mongodb+srv://<user>:<pass>@<cluster>.mongo.ondigitalocean.com/admin?tls=true&authSource=admin&replicaSet=<replica_set>"
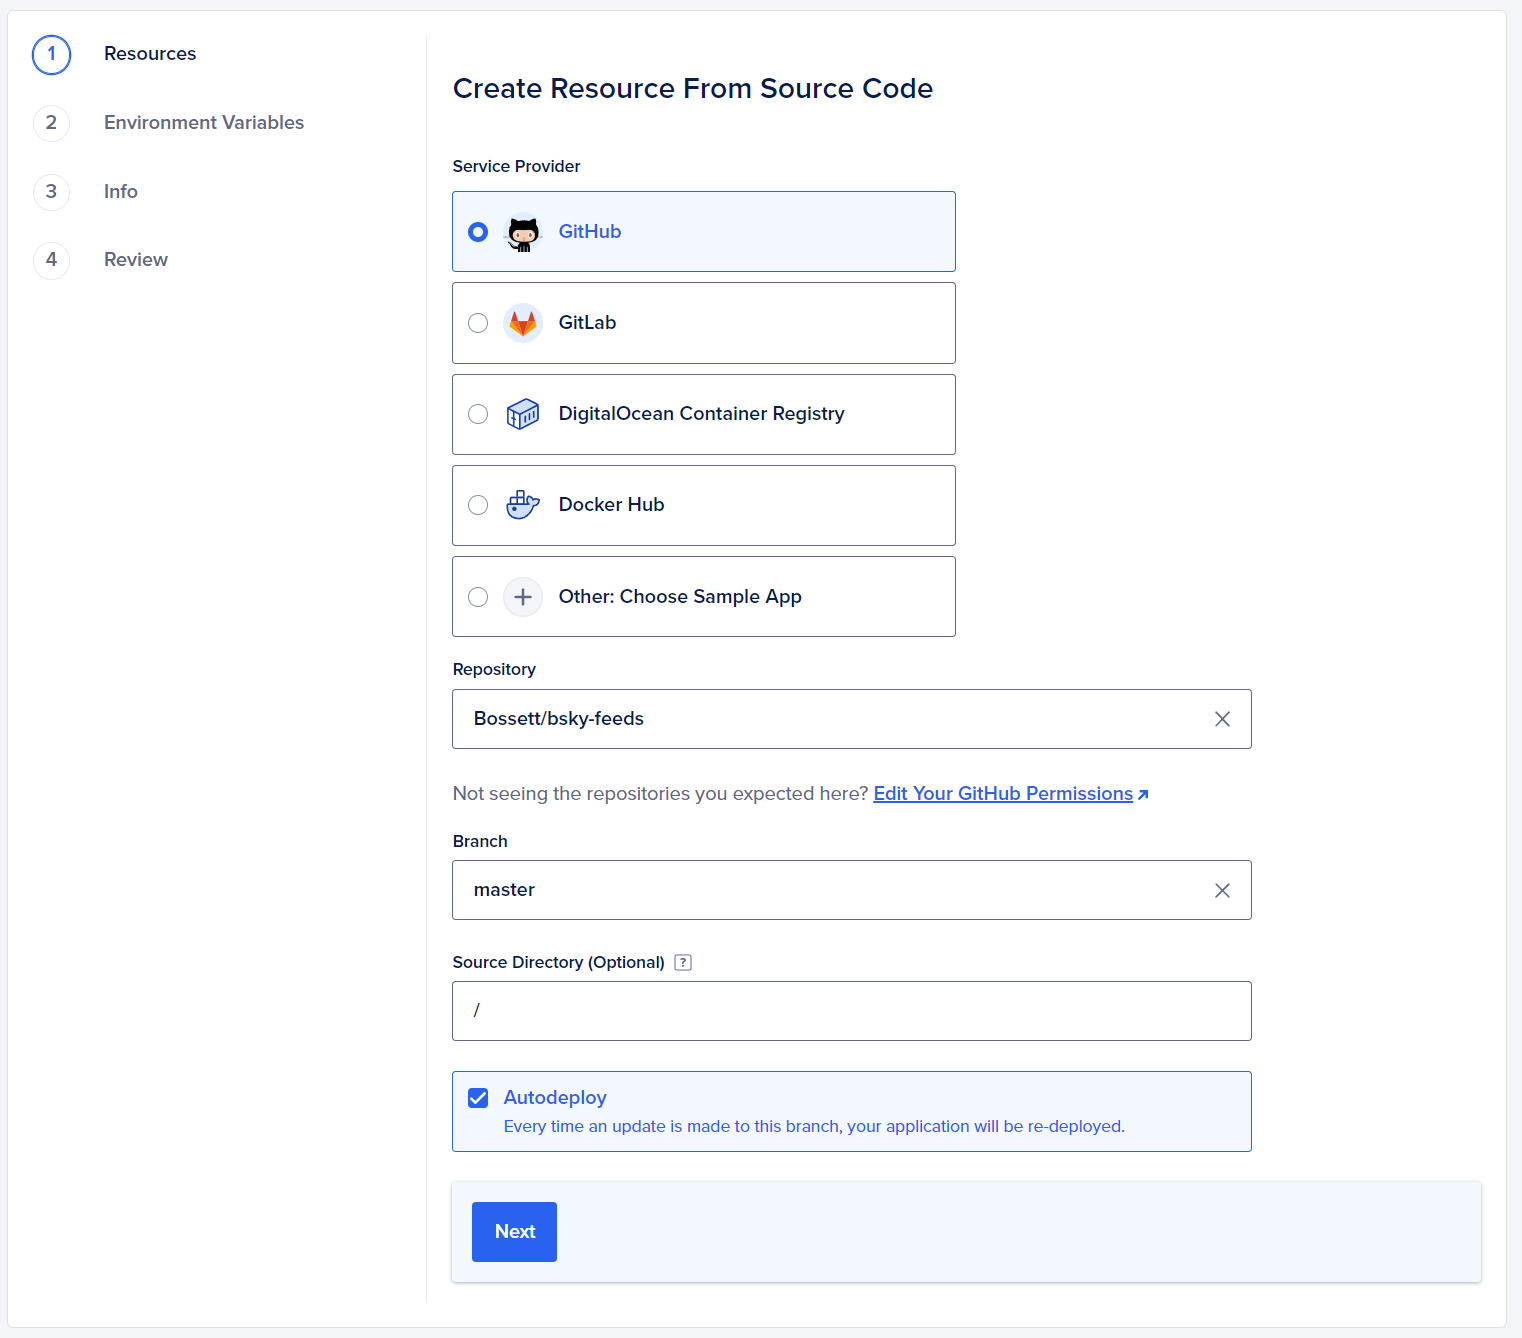
Now visit https://cloud.digitalocean.com/apps and hit 'Create App'.
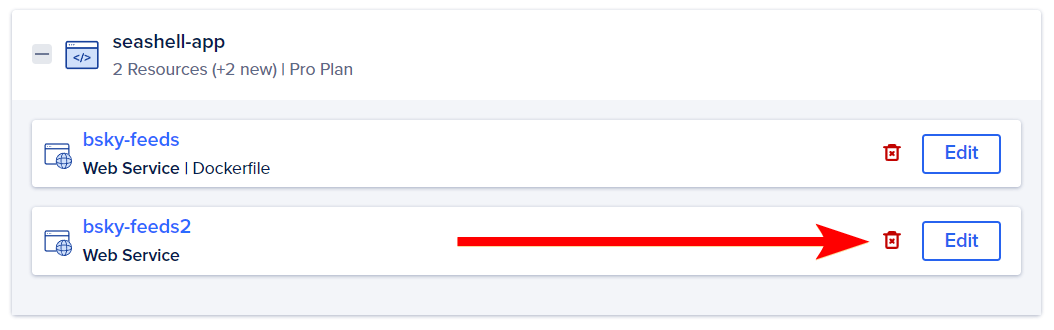
Using your forked repository, create a resource:
Remove any service that doesn't show 'Dockerfile':
Click 'Add Resource', choose 'Database', and 'Add'. Choose 'Previously Created...' and select the MongoDB database you created above.
Choose 'Next' until you are on the Environment screen.
Click 'Edit' next to 'Global' and choose 'Bulk Editor':
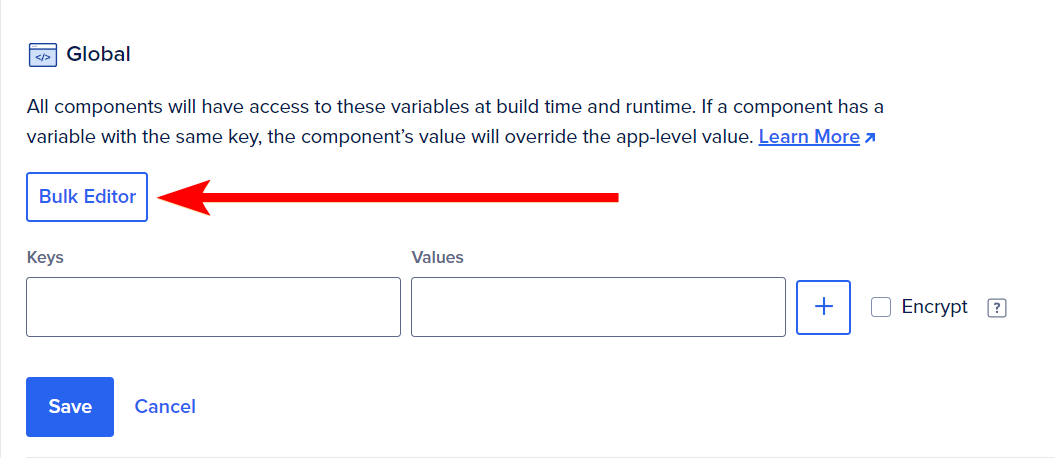
Paste the contents of your .env file into the window that appears and click Save.
- Tick the 'Encrypt' box next to FEEDGEN_PASSWORD and FEEDGEN_MONGODB_CONNECTION_STRING.
- Change FEEDGEN_LISTENHOST to 0.0.0.0
- Click 'Save'.
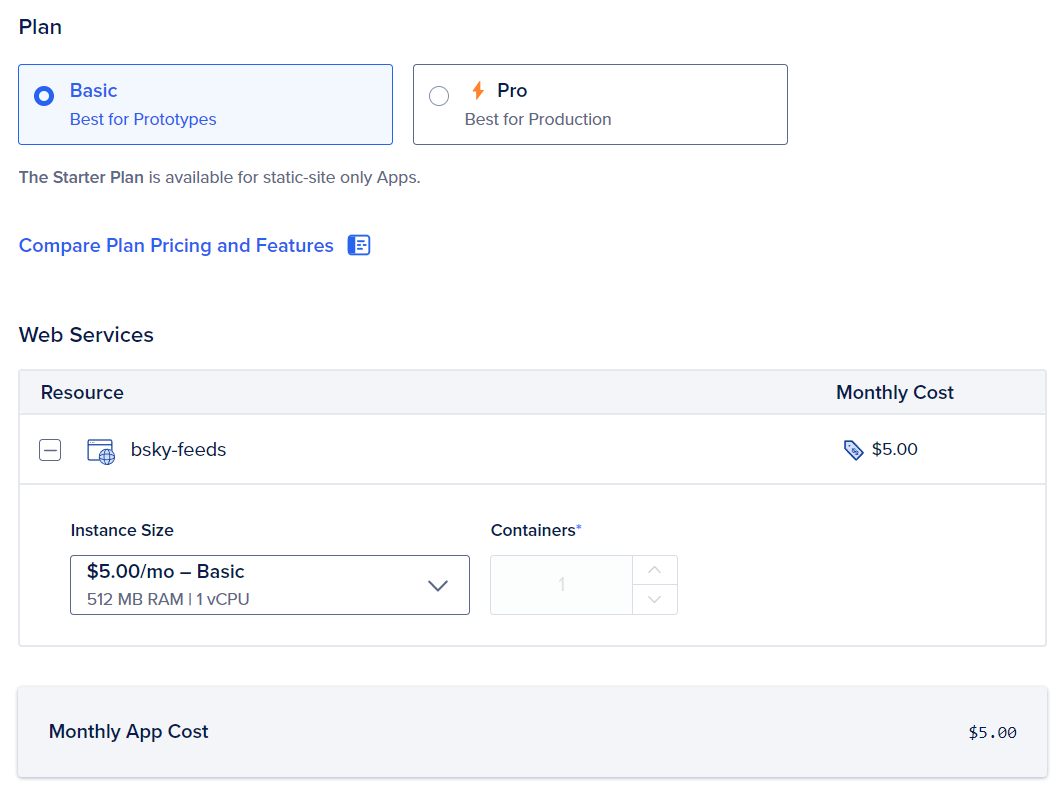
Choose 'Next' until you get to the Review page and choose Edit Plan. Select the Basic plan and the Basic instance size:
Your app will now deploy.
On the Settings tab, you will be able to see the domain you are operating at (it will look like <something>.ondigitalocean.app.
You should be able to construct a URL in a browser and see a blank feed:
https://<something>.ondigitalocean.app/xrpc/app.bsky.feed.getFeedSkeleton?feed=at://<your DID>/app.bsky.feed.generator/for-science
Final Steps with Hosting
Before going any further, it's worth setting up a domain for your feed. You can use the provided ondigitalocean.app domain, but there is no guarantee it will be consistent over time. A better path is using a custom domain, and you will find a guide from Digital Ocean at the settings page of your app under Domains.
Make one last change to your .env file - add either the ondigitalocean.app domain, or your custom domain as FEEDGEN_HOSTNAME.
FEEDGEN_HOSTNAME="<your.host.name>"
In app settings for your App, under 'App-Level Environment Variables' update this value to whatever you put in .env.
I also have my domain behind Cloudflare, which is something to look at. I haven't had an issue with incoming bandwidth, but as Bluesky grows, incoming traffic may become significant, and better to have a service you can leverage all ready to go if you need it.
Making Changes
Once you have the feeds operating on a basic hosting account, you are ready to begin making changes, or preparing to publish your feed.
In your repo directory on your local machine or in the devcontainer, run 'yarn install', and then 'yarn start'. This will confirm that the service is all working correctly. Ctrl-C to end.
You can edit an existing feed or create your own. You can see how they are constructed in the /src/algos folder. The most basic feed has a shortname, implements a handler function to return the feed, and contains a subclass of AlgoManager that implements a filter_post(...) method. This method will be passed every post off the firehose, and where filter_post(...) returns true, that post will be placed in the database with algoTags set to the shortname of the algorithm.
Each feed you add needs to be added to the algos object in /src/algos/index.ts.
You will also need to create a publish<Algo> script in the /scripts/ folder - that script will add the feed to your user profile in the app - look there for how to name & describe it. For convenience, I also add these as scripts to package.json.
I have tried to keep all the database code in /src/db and src/db/dbClient.ts in particular. It should be relatively straightforward to update to a cheaper db technology (i.e. SQLite) by reimplementing those functions.
Troubleshooting
You can find me at https://bsky.app/profile/bossett.bsky.social (which also includes discord and email contacts if you would prefer not to post publicly), or raise a GitHub issue at https://github.com/Bossett/bsky-feeds/issues.
I am also very open to pull requests, requests for changes, or discussions about how to implement a specific algorithm.
Please note that this was written with the code that I have marked with the v2.0.0 branch. The code is under active development, so this guide may not always be up-to-date.
How do I add myself to a list?
If you need to add your own account to a mute list, there is a helper script named 'addSelfToList'. Once you have everything else set up, simply run 'yarn addSelfToList <list at:// URL>'.